Use Ansible and Let's Encrypt to get (OpenShift) proper SSL certs
Written by Ilkka TengvallFor those often rebuilding OpenShift environments, it is ugly to have invalid SSL certificates for the site. Or any web site, for that matter. It requires you to set all tools and browsers to ignore invalid SSL certs. It might even break your testing. You test your OpenShift upgrades and changes in separate test cluster instead of production, right ;) ?
![]()

![]()
![]()
I describe here how I use Ansible, Let’s Encrypt and Route53 DNS to set up my test/demo OpenShift cluster with proper certificates. The method would apply to pretty much any web service you have, not just OpenShift. Check out Let’s Encrypt website if you are not familiar with the wonderful free certificate service.
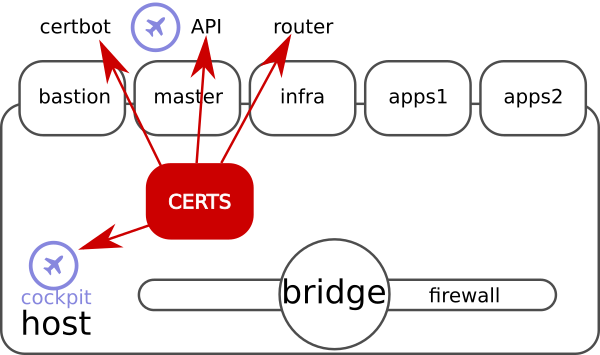
This write-up is about test environments, so I start by describing mine. I have rented a server which comes with CentOS. I use Ansible to install all OpenShift and virtualization requirements into it. Then I create 5 VMs on top of it, and install OCP in there. I also install Cockpit for having graphical panel to control and get visibility into environment. You probably have proper private cloud or virtual environment for this, I don’t.
BTW, if you find such setup interesting, all ansibles are in git for you to re-use.
Here are some use cases “for backlog”
- As an admin, I want proper FQDN for my cluster
- As an admin, I want properly secured Cockpit web GUI on host
- As an OCP user, I want properly secured OpenShift web GUI
- As an OCP user, I want properly secured OpenShift APIs
- As an application user, I want web services on top of OpenShift properly secured
In short, the cluster looks ugly with confirmations about invalid certs, and tools and automation on top of OCP likely breaks without valid certs.
Get domain. This is the hardest part. You need to think of cool name here :) I ended using my “container school” domain, konttikoulu.fi. To get domain, follow AWS instructions, out of scope of this blog.
You need a way to prove you own the domain you request the certificate for. Like mentioned, I use Route53 from AWS to control my domain name. It’s nice that Let’s Encrypt -service’s certbot -tool supports it out of box. There are variety of other DNS provides supported by Let’s Encrypt tooling, see e.g. certbot and acme.sh documentation.
There are at least two different ways of Let’s Encrypt verifying your domain:
Let’s encrypt’s server talks to either:
- Your DNS vendor to verify you own domain
- Your web site (OpenShift router) and verifies that FQDN leads to your web page (see linked blog at bottom for this method)
In this case I use the DNS method. Nice part with it is that it works even if your cluster would not be reachable from internet. For this to work, I followed the instructions to create keys for certbot to use my Route53 for verification.
Let’s get to business. Let’s look at what needs to be done to have proper certs:
- Install let’s encrypt tools to bastion
- Get certificates for
- Cockpit on host
- OpenShift API (same as web GUI)
- OpenShift Router cert (* -cert)
- Modify OpenShift installer inventory to use FQDN
- Modify OpenShift installer inventory to use certs
- run the installer
I have my OpenShift install automation in git. I did this all in one commit which you can see in git diff. Well, actually two, as I got sloppy in first commit, I fixed some variable names in second commit
Setup epel repo for bastion to get certbot tool
Note that I also disable it by default, so that I don’t accidentally install non-supported versions of software, which might break installation.
- https://dl.fedoraproject.org/pub/epel/epel-release-latest-7.noarch.rpm
package: name={{ pkgs }} state=present

- name: disable epel by default installations
lineinfile:
path: /etc/yum.repos.d/epel.repo
regexp: '^enabled=1'
line: 'enabled=0'

- name: install certbot from epel
yum:
name:
- certbot
- python2-certbot-dns-route53
enablerepo: epel
state: present
Check if we have previously acquired certificate
We setup cron later to keep cert up to date. So we don’t want to unnecessarily run setup again.
- name: Check if let's encrypt is already done on previous runs
  stat:
    path: "/etc/letsencrypt/live/{{ api_fqdn }}/fullchain.pem"
  register: cert_exists
Setup AWS key and acquire the cert
I drop the certbot’s AWS access key into default AWS config file. Note not to use your admin key here just for good practice!
- name: Lets encrypt cert for ocp
  block:

    - name: create awx secrets
      file:
        path: /root/.aws
        state: directory
        mode: 0600
    - copy:
        dest: /root/.aws/config
        mode: 0600
        content: |
          [default]
          aws_access_key_id={{aws_access_key_id}}
          aws_secret_access_key={{aws_secret_access_key}}
Acquiring the certs is one command
See the keys get created into /etc/letsencrypt directory. Notice to put
all FQDNs into cert via -d switch.
    - name: get let's encrypt cert
      command: >
        certbot certonly --dns-route53 --non-interactive --agree-tos
        --server https://acme-v02.api.letsencrypt.org/directory
        -m "{{ letsencrypt_email }}"
        -d "{{ api_fqdn }}" -d "{{apps_fqdn}}" -d "*.{{apps_fqdn}}"
      args:
        creates: "/etc/letsencrypt/live/{{ api_fqdn }}/fullchain.pem"
Setup periodic renewal of certs
Let’s encrypt issued certs live only for 90 days. So if I keep using the same bastion, I will always have valid certs in the same place, updated by certbot in cron. Remember there is another ansible you need to run to put renewed certs into OpenShift cluster if you keep running this env for long.
    - name: put let's encrypt to renew certs periodicly
      cron:
        name: "renew certbot certs"
        minute: "20"
        hour: "02"
        weekday: "2"
        job: "certbot renew &> /dev/null"
Keep it optional
This is for myself only. I wanted to keep an option to use the same ansibles without using certbot. If I don’t define AWS keys, it won’t do certs. This is work in progress still… I forgot to make it conditional in inventory template.
  when:
    # we do let's encrypt if AWS keys are provided, and we do it only once
    - aws_access_key_id is defined
    - aws_secret_access_key is defined
    - cert_exists.stat.islnk is not defined
Ensure installer is allowed to access keys and certs
By default keys are protected. This allows installer access to keys.
- name: Allow installer access to ssl certs
  file:
    path: "{{ item }}"
    state: directory
    mode: 0705
  with_items:
    - /etc/letsencrypt/live
    - /etc/letsencrypt/archive

- name: Allow installer access to ssl key
  file:
    path: /etc/letsencrypt/archive/{{ api_fqdn }}/privkey1.pem
    state: file
    mode: 0704
Set installer inventory to use the FQDN and certs
You need to tell installer to set FQDN to be used to your cluster. Below I set it for master API and some services. See also the definition for certs.
openshift_master_cluster_public_hostname={{ api_fqdn }}
openshift_master_default_subdomain={{apps_fqdn}}
openshift_logging_kibana_hostname=logging.{{apps_fqdn}}

openshift_master_named_certificates=[{"names": ["{{ api_fqdn }}"], "certfile": "/etc/letsencrypt/live/{{ api_fqdn }}/fullchain.pem", "keyfile": "/etc/letsencrypt/live/{{ api_fqdn }}/privkey.pem", "cafile": "/etc/letsencrypt/live/{{ api_fqdn }}/chain.pem"}]

openshift_hosted_router_certificate={"certfile": "/etc/letsencrypt/live/{{ api_fqdn }}/fullchain.pem", "keyfile": "/etc/letsencrypt/live/{{ api_fqdn }}/privkey.pem", "cafile": "/etc/letsencrypt/live/{{ api_fqdn }}/chain.pem"}

openshift_hosted_registry_routecertificates={"certfile": "/etc/letsencrypt/live/{{ api_fqdn }}/fullchain.pem", "keyfile": "/etc/letsencrypt/live/{{ api_fqdn }}/privkey.pem", "cafile": "/etc/letsencrypt/live/{{ api_fqdn }}/chain.pem"}
Host’s Cockpit Certificates

There is similar logic for host server’s Cockpit. See the commit in git, I don’t copy paste it here as it’s almost identical to above steps.
You could do the same for Cockpit at OpenShift master. I didn’t bother, as I use the Cockpit from host, and tell that to connect to OpenShift master’s Cockpit. So my browser never hit’s it directly. Did you know you can have several host’s Cockpits used from one Cockpit web GUI?
Note, if you copy paste the code in previous link, there is an erroneous
redirect. Change >> to > in there, to avoid stacking the certs into one
file. It’s fixed in later commits.
So now, with those few ansible lines, and running installer, you could turn your OpenShift and Cockpit to use proper certs. I believe they are pretty re-useable to any SSL service you might have. Happy safe internetting for you and your OpenShift users!
Links for related docs and blogs
Here are links to official documentation, and another blog that has a bit different way of setting the router address. It’s definitely better for router. It is based on the non DNS way of ensuring web site, and will generate application specific certs instead of wildcard cert. It’s a good reference for the next step for you to take.
- Ansible tasks file we went through here
- Ansible automation which sets up my test env
- OpenShift SSL certs documentation
- OpenShift SSL certs renewing
- Great blog from Red Hat colleagues to do certs the other way for apps
- Certbot tool for Let’s Encrypt certicates
- acme controller for OpenShift
- acme script for Let’s Encrypt certificates supports variety of DNS services.
BR,
ikke
PS, Let’s Encrypt takes donations here.
I work as an SA at Red Hat Nordics, mainly with speeding things up using automation and hybrid cloud.